Virtually every site provides its users with a way to contact them and submit questions or comments about the site. It's such a common application that DotNetNuke provides a Feedback module out-of-the-box. While DNN's Feedback module serves the basic needs of many sites, you purchased XMod to create forms that were customized to your site's needs. So, we'll show you how to create a customized Feedback or Contact Us form in XMod, complete with the ability to send a notification email to the site administrator and a different notification email to the user. Along the way, we'll also show you how to pre-fill parts of the form to save your user a little typing, change the text of the "Submit" button, hide the "Cancel" button, and even save the user's IP address for reference.
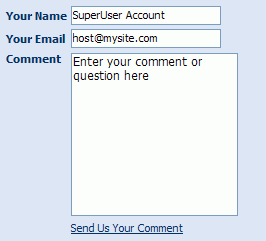
A preview of the form is pictured below. It's very similar to DNN's built-in feedback form. Yet, even our simple form already does more than the static DNN module and, should we choose, we can always customize it to suit our needs. In the preview, the form is being viewed by the Host, or Super User account. You can see that the user's name "SuperUser Account" and email "host@mysite" are pre-filled for the user. If DNN user John Doe, with the email of [email protected] were viewing the form, he would see "John Doe" and "[email protected]" in the Name and Email fields, respectively. Two other items bear mentioning: The Comment field is pre-filled with some helpful information, instructing the user what to put in that field; and the "Submit" button bears our custom "Send Us Your Comment" text. Note also, that there is no Cancel button, as it doesn't mean much to the user in this context.
Let's start building...
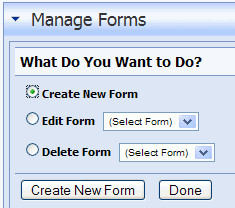
In the Manage Forms page, select the "Create New Form" option and click the "Create New Form" link.
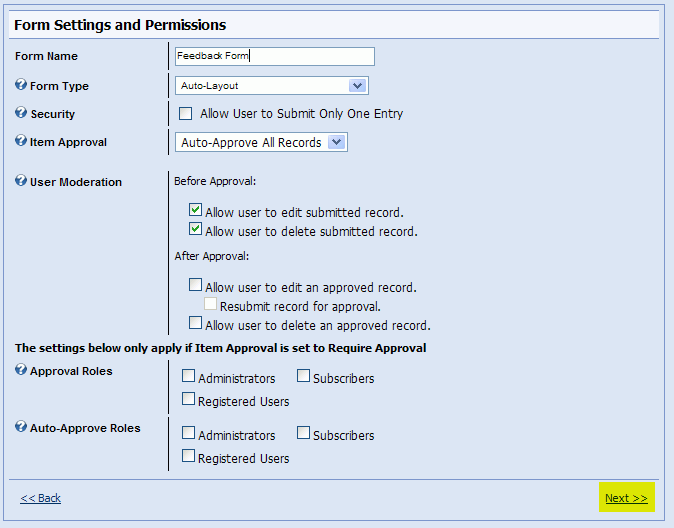
On the next page, type in the name you'll use to identify this form, ensure that Auto-Layout is selected for Form Type, the Allow User to Submit Only One Entry is un-checked and Auto-Approve All Records is selected for Item Approval. Then, click the "Next>>" link.
.
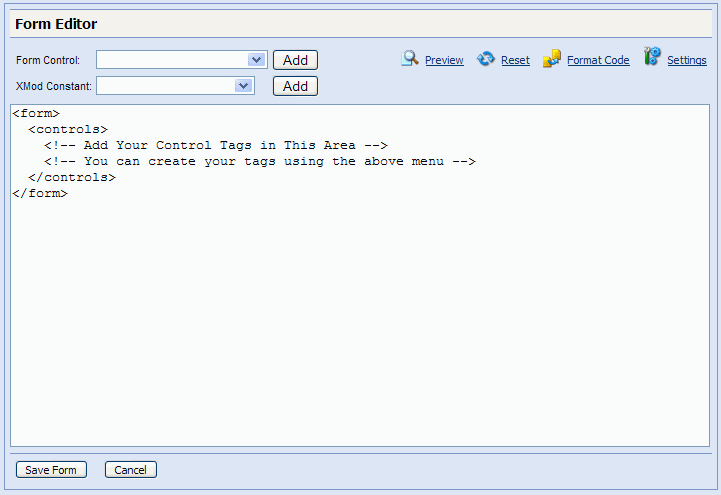
Next you'll see the Form Editor area:
For more information on the Form Editor and the Manage Forms page in general, view the "Manage Forms" help topic.
Replace the contents of the Form Editor with the code you see below:
|
<form> |
Let's look a little closer at the code and explain what's happening:
<input ref="Name" class="NormalTextBox" width="150" maxlength="60">
<label>Your Name</label>
<default>{XMOD_UserFullName}</default>
</input>
Here we're creating a single-line text box with an ID of "Name", a CSS class of NormalTextBox, a width of 150 pixels and which restricts the user to a maximum of a 60 characters. The control will have a caption of "Your Name". Finally, we're using an XMod Constant as the default value for the field. The {XMOD_UserFullName} constant will be replaced at run-time by the First and Last Name of the user, presuming he/she is logged in. If they're not, then the constant will return a blank. The result: if there's a full name for the user, it will be plugged-in for them automatically. If not, they'll just see an empty text box.
<input ref="Email" class="NormalTextBox" width="150" maxlength="60">
<label>Your Email</label>
<default>{XMOD_UserEmail}</default>
</input>
We use essentially the same idea with the user's email address. We create a text box with an ID of "Email" and pre-fill the box with the user's email address, if we can. The code for the multi-line text box (or textarea) is very similar to what we've already seen. We don't use any XMod Constants for the default value, just some plain explanatory text. One difference between the text box and textarea is that the text area's dimensions are specified in columns and rows, rather than pixels.
<hidden ref="UserIP">{XMOD_UserHostAddress}</hidden>
The <hidden> tag is a control that is used for tracking information you don't want the user to see or manipulate. It is similar to HTML's <input type="hidden"> tag. Since it's not visual, there are no associated style-type properties. It's merely used to store hidden data. In this case, we're using another XMod Constant which retrieved the user's IP address if it's available. For security purposes, many site owners like to see where a request is coming from.
<email target="[email protected]" from="{Email}" subject="Feedback Form Submission">
<content format="html">
<literal>
<div style="font-family:Arial;font-size=12px;">
<strong>Name:</strong> <xmod:field name="Name"/><br />
<strong>Email:</strong> <a href="mailto:<xmod:field name="Email"/>"><xmod:field name="Email"/></a><br />
<strong>
<strong>Comment:</strong><br />
<xmod:field name="Comment"/>
</div>
</literal>
</content>
</email>
This is the first of two <email> tags. XMod allows you to define multiple email templates which define how an email will look and what data it contains. These email templates can then be set to be sent to different and multiple email addresses. This is a nice feature if, as in our example, you'd like to send detailed information to your sales staff or web admin, but also send a nice custom-friendly email to your user. Though we don't use the feature here, you can also restrict the email to be sent only when a new record is created, only when a record is updated, or both. The first email template we're defining is the one that will be sent to the site's administrator. There are a few points of interest in the above code:
<email target="[email protected]" from="{Email}" subject="Feedback Form Submission">
The target is the email address to which you want the email sent. You can specify multiple addresses by separating them with commas. The from attribute contains what looks similar to an XMod constant. Actually it's a control value placeholder. At run-time, the {Email} will be replaced with the value in the control with the Email ID (the ref property). Note, there are some additional properties of the <email> tag that you may want or need to set in order for email to be sent correctly such as smtppassword and other properties. You can see those under the <email> help topic.
<content format="html">
<literal>
This bit of code is required. The <content> tag marks the beginning of the email's template. It tells XMod that the content will be sent as an HTML email. Next we see the <literal> tag. This is necessary because the form is an XML document and, since we'll be using HTML and XMod tags in our email template, those tags may not be properly formed XML - thus causing an error when XMod tries to process the form's definition. For those of you familiar with XML, you can think of the <literal> tag as <![CDATA[ and the closing </literal> tag as ]]>.
<div style="font-family:Arial;font-size=12px;">
<strong>Name:</strong> <xmod:field name="Name"/><br />
<strong>Email:</strong> <a href="mailto:<xmod:field name="Email"/>"><xmod:field name="Email"/></a><br />
<strong>
<strong>Comment:</strong><br />
<xmod:field name="Comment"/>
</div>
Here we're simply laying out our email with HTML. You'll notice that we're using <xmod:field> tags much as we would in a list or detail template to position data from our form. As you're crafting your email template, remember that, while HTML will be displayed, the email is not the same as a web page. You can't rely on your site's CSS styles as those files reside on your web server, and not on the email recipient's machine. .
</literal>
</content>
</email>
And finally we close the <literal>, <content>, and <email> tags.
The second <email> tag is very similar to the first. In this case, though, we're defining an email that will be sent to the customer. Thus, we're placing the {Email} control placeholder as the value of the target attribute so the email will be sent to the address specified by the customer. We're also just sending some plainly formatted text thanking them for their submission.
<addbutton text="Send Us Your Comment" class="CommandButton"/>
<cancelbutton text=""/>
The last bit of code we'll look at in this form is the add and cancel buttons. Here we're changing the default text of the "submit" link to something more appropriate for our form. "Send Us Your Comment" is more instructive that the default text of "Add Item". Additionally, since there really is no need for a Cancel button on a form of this nature, we've decided to hide it. We do that by defining the <cancelbutton> tag and assigning an empty value to it.
Click the Save Form link at the bottom of the page and then the Return link.
While you can certainly use your new form from a standard XMod module instance, In most cases, you'll want to use the FormView module to display your Feedback form. This allows you to place your form wherever you need it, just like DNN's Feedback module. If you haven't already configured XMod to use the FormView module, do so now by following the FormView installation instructions found here.
Once you've installed the FormView, setting up your module is very easy. Simply add an XMod FormView module to your page and set a couple of properties in the "Configure XMod Module" page, like so:

Select "Feedback Form" from the Data Entry Form drop-down list. Additionally, if you'd like a different message to be displayed to your user after he/she submits the form, you can set that in the "Messages" section on the Display Settings tab.
Click the Save Changes link and your Feedback for is ready to run.