In this walkthrough we'll be creating a data-entry form for entering ebook reviews. The data-entry form is one part of the three you typically need when developing a solution in XMod. The other two are templates - one for viewing lists of records and the other for showing a single record. Together, these templates enable you to tell XMod how the data entered through your form is displayed. You'll learn how to create display templates in the Creating A Template Walkthrough.
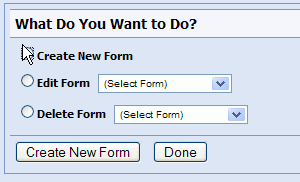
To get started, add an XMod module to a page. Notice that XMod reports the module hasn't yet been configured. Let's rectify that. To do so, we'll need to create a data-entry Form. From the Actions menu, select "Manage Forms". Note, you must be logged in as an administrator or host to see this.
The Manage Forms screen allows you to add, edit, and delete forms from XMod.
If this is the first form you've created, the Edit Form and Delete Form options will be grayed out. Select the Create New Form option and then click the Create New Form link. This will take you to the Form Settings and Permissions panel. You can find detailed information on this panel in the Manage Forms help topic.
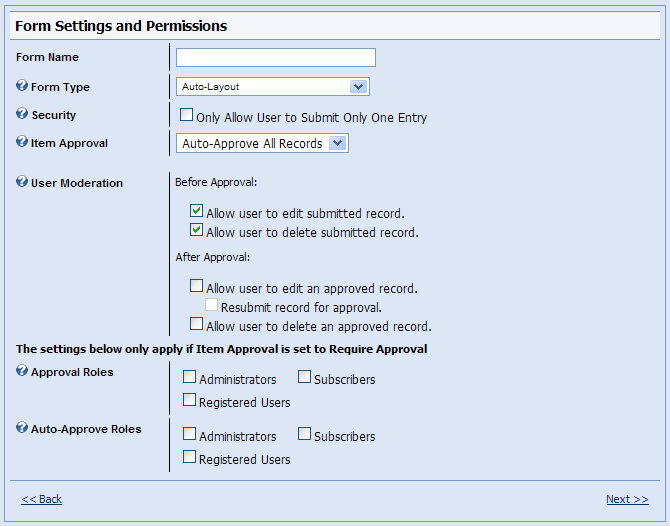
For this example, we'll pretend we're running an ebook website and we want to add an "Ebook Reviews" section to the site.
In the Form Name field, enter: Ebook Reviews
Leave the other settings as you seem them in the image above.
Click the Next >> link to go to the Form Editor panel. Details on this pane can be found in the Manage Forms help topic.
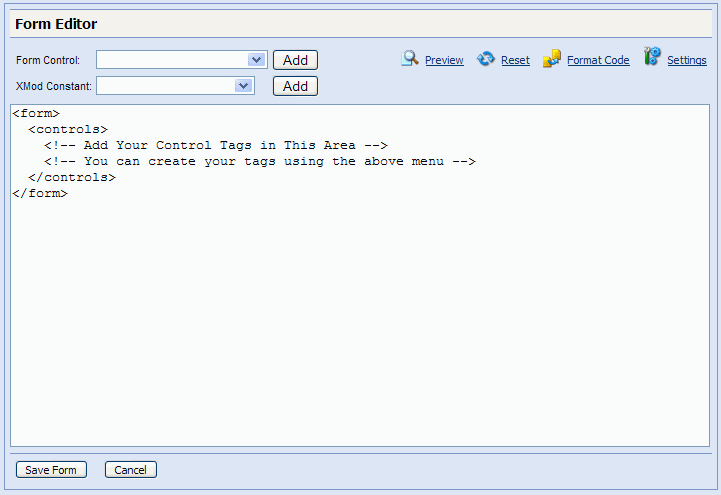
Don't Panic! If you're not a programmer and are not familiar with HTML, this screen can look a little intimidating at first. However, if you look a little closer, you'll see that creating a form definition in XMod isn't all that difficult.
Notice that the form starts with a <form> tag and ends with a </form> tag. the "/" indicates it's the closing tag. Together, they tell XMod where the form definition begins and where it ends. You'll see the same pattern used for the <controls> and </controls> tags.
Inside the <controls> and </controls> tags, you'll find HTML "Comment" tags.
They start with <!-- and end with --> The comments you see when you first create a form are meant to help guide you and aren't necessary to keep. You can delete them. After deleting them, your form definition will look like this:
<form>
<controls>
</controls>
</form>
Between the <controls> and </controls> tags is where most of the action takes place in your forms and it is where you'll put your controls. XMod can do much of the work for you. The Form editor contains two drop-down list controls at the top of the editing area. The first allows you to insert form controls and the second allows you to insert "dynamic" data such as the current user's name, address, the Portal name, the current date and much more.
For this example, we're only concerned with the Form Controls list box. Note that this contains the most commonly used controls. When you get more comfortable with XMod, please browse the list under the Form Controls section of this help file.
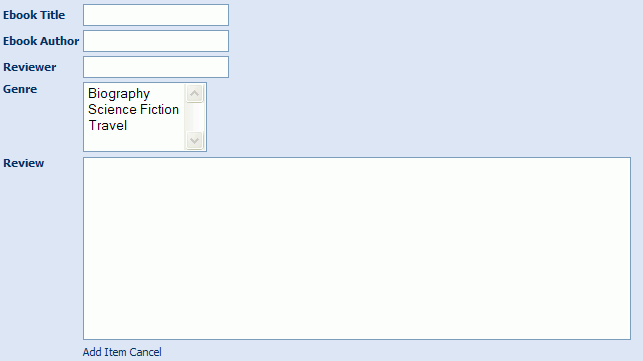
Our ebook review will consist of the ebook's Title, Author, Genre, and of course, the review. In the end it will look similar to this:
Creating the Title input text box:
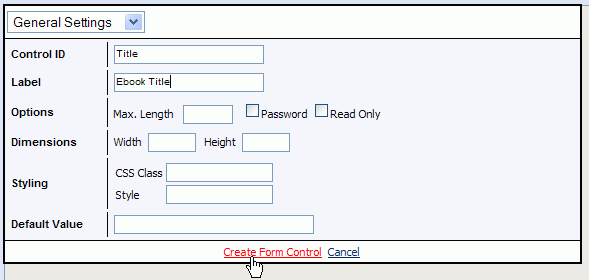
In the text editing area of the Form Editor, place your cursor anywhere in between the <controls> and </controls> tags. From the Form Controls drop-down list box, select Text Box and click the Add button. This will popup the text box control designer. If the designer doesn't pop-up, please ensure you have Javascript enabled in your browser. Each control's designer allows you to easily set the properties and values that determine how the control will look and behave. Since we're just creating a basic form, we'll only focus on the basics. Fill in the text box designer to match the image below, then click the "Create Form Control" link
Once you click the Create Form Control link, the designer will disappear and the following text will have been inserted into the form editing area:
<input ref="Title">
<label>Ebook Title</label>
</input>
There are three things to notice here: First, XMod has inserted an opening <input> and closing </input> tag. In the opening <input> tag, however, there is also an attribute (also called a property) with the name of "ref". The "ref" property has a value of Title - the text contained within the double quotes - which you entered in the "Control ID" field of the designer. Each control can have its own set of properties. All properties are defined in the same way - that is, they start with the property name, followed by the "=" sign and the value of the property is placed within double-quotes.
While different controls will have different properties, you'll find that most of them require the "ref" property. This is essentially a unique name for the control. No other control on the form can have the same "ref" because XMod uses this value to find and work with your control behind the scenes. Ref values cannot contain spaces or punctuation. They can contain numbers, but can't begin with a number.
Second, there is a child tag - a tag within the <input> tag called <label>. In between its opening and closing tags, you'll find Ebook Title, the value you entered in the designer for "Label". Almost all controls are required to have a <label> child tag.
Finally, you may have noticed your <input> tag isn't indented too well. This is easily rectified. Simply click the: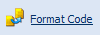 link and XMod will properly indent your code to make it more readable. You can click this at any time, but for the rest of the controls, we'll simply create them all and then click the Format tool link at the end.
Create the Author text box. The process is nearly identical to the Title text box we just created. Place your cursor after the closing </input> tag of the Title text box, select "Text Box" from the Form Controls list box. This is where the Author text box will be inserted. Fill in the designer with Author for the Control ID and Ebook Author for the label. Finally click the Create Tag link to create the control's tag.
Creating the Genre list box: List controls are made up of multiple items - genres in this case. Each item in a list box has a display text (i.e. "Biography") that is visible to the user and a hidden value ("1" or "bio" or "Biography" or whatever else you want) that can be used internally by your form and templates.
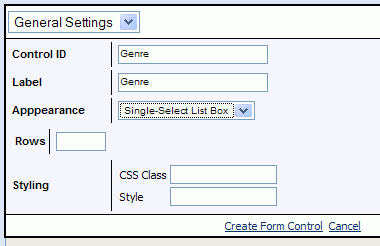
To create the Genre list box: Place your cursor after the closing </input> tag of the Author text box. From the Form Controls drop-down list box, choose "Single Select List". This means the user will only be allowed to choose one item from the list. If you wanted to allow more than one selection, you would choose Multi-Select List. List controls can come in different forms. You could have a drop-down list box, a single-selection list box, or a list of radio buttons. We'll create a single-select list box. To do this, fill in the designer as you see below but don't click Create Tag yet:
Next, we need to actually provide the control with a list of genres. To keep things simple, we'll limit the list to 3 items.
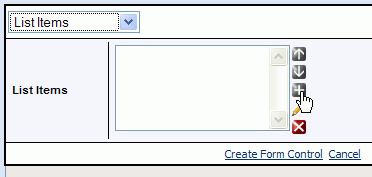
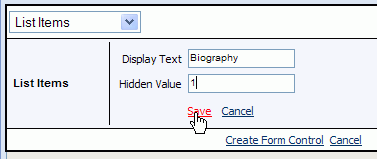
Adding items to our Genre list box: Click on the drop-down list box at the top of the designer and select "List Items". This is where you'll define items to go in your list control. Click the + image as shown below to add an item.
This will display two fields - one for the Display Text and the other for the hidden value. Fill in the form as shown and click the "Save" link to add your item to the list.
Repeat the process to add the other two genres: Science Fiction (hidden value of 2) and Travel (hidden value of 3). In the end, your list should look like this:
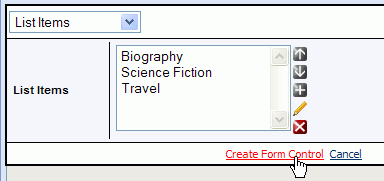
You can change the order by selecting an item and clicking the up or down arrow. You can edit an item by selecting it and clicking the pencil icon. Finally, you can delete and item from the list by selecting it and clicking the red box with the X on it. Now that we've created the list items, all we need to do is click "Create Tag"
Analyzing the Genre List Box code. We've highlighted part of the code in red and grayed-out the rest to make it easier to focus on what we're describing
<select1 ref="Genre" appearance="compact">
<label>Genre</label>
<items>
<item>
<label>Biography</label>
<value>1</value>
</item>
<item>
<label>Science Fiction</label>
<value>2</value>
</item>
<item>
<label>Travel</label>
<value>3</value>
</item>
</items>
</select1>
You'll see that a single select list control has a tag name of "select1" (i.e. select 1 item). A multi-select list control would just be called "select". It also has a <label> child tag as most controls do. In addition to the required "ref" property, XMod has added an "appearance" property with a value of "compact". The value of this property is determined by what you selected in the "Appearance" drop-down list on the list control's designer.
<select1 ref="Genre" appearance="compact">
<label>Genre</label>
<items>
<item>
<label>Biography</label>
<value>1</value>
</item>
<item>
<label>Science Fiction</label>
<value>2</value>
</item>
<item>
<label>Travel</label>
<value>3</value>
</item>
</items>
</select1>
The items in your list are contained in between the <items> and </items> tags. Each item in the list has a corresponding <item> </item> tag pair which contain a <label></label> with the item's display text and a <value> </value> tag pair that contains the hidden value of the item.
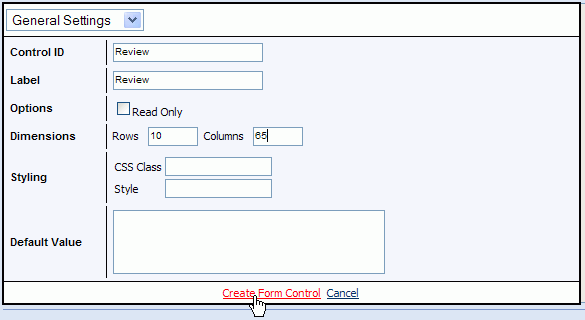
Finally, we'll create a multi-line text box, or text area, where the reviewer can enter the actual review. This is created much like the other controls. Place your cursor after the closing </select1> tag of the Genre list box. Select Multi-line text box from the Form Controls drop-down and fill in the form like below and click the Create Tag link:
Now would be a good time to click the Format tool link to pretty-up the form definition, then click the Save link underneath the text editing area to save your form.
But what good is a form to gather data without some way to display that data? To find out how to create display templates, visit the Creating A Template Walkthrough which will step through creating various templates to display our ebook reviews.
For More Information on how to further customize your form, refer to the Form Controls section of the help file.