Walkthrough: Creating A Template
Templates are used to tell XMod how to display data entered with your
forms. In most respects, they are like HTML pages since you use HTML tags
to position and format your data. Most HTML tags which are found in the
<body> of an HTML page are valid in a template, so you are free
to design the page in just about any way you like.
What makes templates different than HTML pages is that they also use
special XMod Template Tags. These tags are much like HTML tags, except
that they tell XMod what data to get and where to put it. All XMod Template
Tags begin with "xmod:". For example, the one you'll probably
use most is the "<xmod:field>" tag. As with HTML tags,
most XMod tags have attributes that determine how they function. For the
<xmod:field> tag, one required attribute is the "name"
attribute. The name attribute determines which form field's value to retrieve.
There are others, like "maxlength"... they are detailed in the
Template Tags reference section of this help file.
Templates come in two basic flavors - List View templates which present
a browse-able list of records (this could be presented to the user as
a list or grid or a custom list type via the Repeater template type) and Detail View templates which present a single record.
The easiest way to think of this is by imagining a news site which presents
you with a list of headlines (perhaps with a synopsis of each story).
This is the list view. You then click a headline to read the full story.
This is the detail view. One of the strengths of XMod is that you aren't
limited to a single view of the data. You can create multiple templates
- each with its own look and/or functionality - but all of them working
from the same set of data, the data entered via an XMod form. So, you
could create a template for your normal visitors and one for your site
editors and one for your content providers.
In this walkthrough, we'll be creating a total of 3 templates: 1) A
list view template, displayed as a list; 2) A list view template, displayed
as a Grid; and 3) A detail view template. Each of these templates will
be designed to display data from the Ebook Reviews form created in the
Form Walkthrough.
A Note About Syntax of XMod Tags.
It is very important that you use the proper format when using XMod
tags. Most tags are "empty" tags, meaning that they do not have
a closing tag. For example, the <p> tag in HTML is a "tag"
pair, written as <p>.... some text ... </p>. However, the
<img> tag is an empty tag, as it doesn't have the closing tag. Using
proper XHTML syntax, the <img> tag should be written as <img
src="/images/myimage.gif" /> Here, the tag is written as
a single tag, but the tag is written with the closing "/>"
Empty XMod tags should be written this way. The examples in the Template
Tag reference should guide you in properly constructing a tag.
Creating the Templates
To refresh your memory, the fields we created in our Form Walkthrough,
for entering Ebook Reviews are listed below:
Title (text box)
Author (text box)
Reviewer (text box)
Genre (single-select list box)
Review (textarea, also called a multi-line text box)
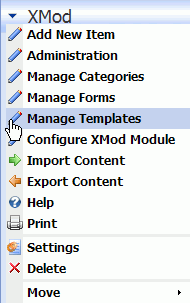
To begin, if you haven't already added an XMod module to a tab, do so
now. On the Actions menu, select "Manage Templates." This screen
is where you add, edit, and delete display templates.
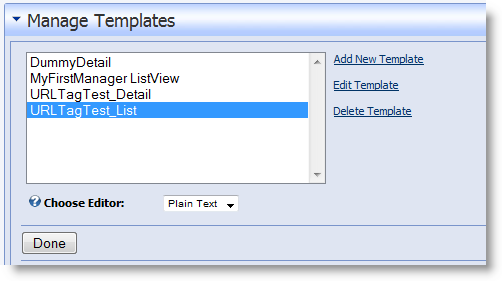
- From the "Manage Templates" starting panel, ensure that "Plain Text" is selected in the Choose Editor drop-down listbox.
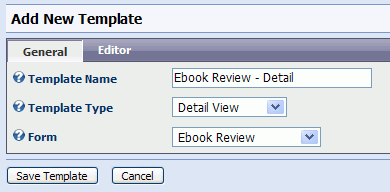
- Click the Add New Template
button to display the Add Template panel. Enter a descriptive name for
this template. We'll first be creating the Detail view for the review,
so an appropriate name might be: "Ebook Review - Detail". If
it's not already selected, choose Detail View as the Template Type. Finally,
to help XMod help you save some keystrokes when you create your template,
select Ebook Review for the Form Fields list box. Note that when you select
a new Template Type and when you select a new Form Fields form, the page
will post back to the server so that XMod can make the necessary changes
to the page. If, however, you use the keyboard to select new items, the
post back will not occur and the changes will not happen. For this reason,
it's always advisable to use your mouse to change the selection of these
list controls.
- Next, click the Editor
tab (shown in the gray bar next to the General
tab) to see the template editor.
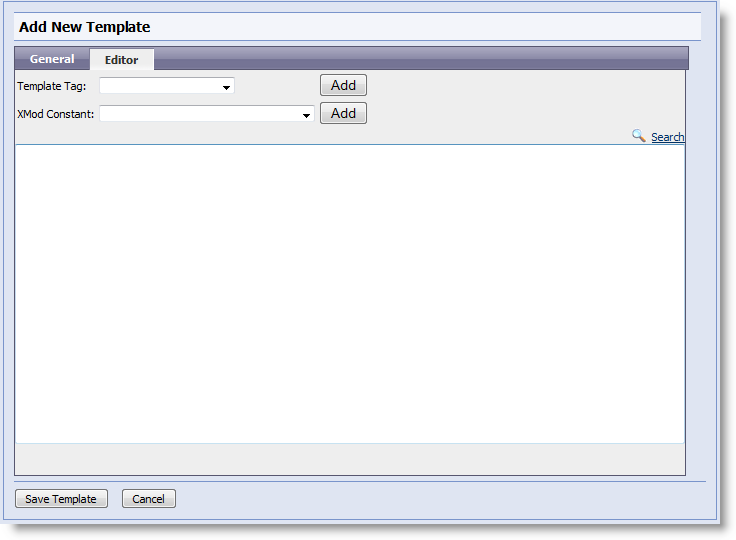
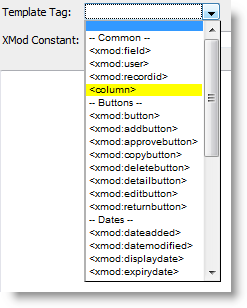
In the toolbar area you'll see two drop-down list controls: Template
Tag and XMod Constant.
These are very similar to the drop-down lists in the Form Editor. Template Tag contains a list of tags
you can use in your template. Selecting an item from this list and clicking
the Add button will either pop-up
a tag designer or insert text into your template. The XMod
Constant list control contains the same type of dynamic data that
we found in its counterpart in the Form Editor. Items in this list allow
you to insert the portal's ID, the current user's name, the current date,
the user's IP address and more.
- More details on how to use the template editor
can be found in the help topic How
Do I Create A Template. For the purposes of this example, though,
we'll simply copy and paste text into the editor. In the text box enter
the following code:
<div class="Normal">
<h2><xmod:field name="Title"/></h2>
<strong>Author:</strong> <xmod:field name="Author"/><br
/>
<strong>Genre:</strong> <xmod:field name="Genre"/>
<br />
<strong>Reviewed By:</strong> <xmod:field name="Reviewer"/>
<br /><br />
<strong>Review:</strong><br />
<xmod:field name="Review"/>
</div>
Now, let's explain a bit about what all that code means. We'll gray
out certain parts of the code, to make it easier to focus on the item(s)
we're discussing...
<div class="Normal">
<h2><xmod:field name="Title"/></h2>
<strong>Author:</strong> <xmod:field name="Author"/><br
/>
<strong>Genre:</strong> <xmod:field name="Genre"/>
<br />
<strong>Reviewed By:</strong> <xmod:field name="Reviewer"/>
<br /><br />
<strong>Review:</strong><br />
<xmod:field name="Review"/>
</div>
In the code above we're creating a <div> tag to wrap our template.
A <div> tag is an HTML tag used to contain other items - usually
for the purposes of applying certain styles to the contained items or
to aid in laying out text on the page. In our case, we've added it to
make it easy to apply the CSS "Normal" style to our text in
one fell swoop (class="Normal"). The "Normal" CSS
class is built into DotNetNuke and is typically used for most text throughout
the site.
<div class="Normal">
<h2><xmod:field name="Title"/></h2>
<strong>Author:</strong> <xmod:field name="Author"/><br
/>
<strong>Genre:</strong> <xmod:field name="Genre"/>
<br />
<strong>Reviewed By:</strong> <xmod:field name="Reviewer"/>
<br /><br />
<strong>Review:</strong><br />
<xmod:field name="Review"/>
</div>
We want to create a heading for the title of the ebook we're reviewing.
So we use the HTML <h2> tag, which indicates the content it contains
is a 2nd-level heading. You could change this to an <h1> to indicate
the title is a top-level heading, <h3> for a 3rd-level heading,
or some other tag, depending on your needs. For our purposes, <h2>
tags typically tend to be displayed as fairly large, bold text - but not
so large that they dominate the page (as is the case typically for <h1>
tags).
Inside the <h2> and </h2> tags, you'll find <xmod:field
name="Title"/>. This is an <xmod:field> tag is the
most often used template tag. The reason is simple. This is the tag you
use to position data from fields in the record. If you look at all the
<xmod:field> tags, you'll see that they all contain a "name"
property whose value is the name (i.e. the "ref" value of a
form control tag) of a control on our form. In this case it's "Title",
which is the title of the ebook that has been reviewed.
<div class="Normal">
<h2><xmod:field name="Title"/></h2>
<strong>Author:</strong> <xmod:field
name="Author"/><br
/>
<strong>Genre:</strong> <xmod:field
name="Genre"/> <br
/>
<strong>Reviewed By:</strong> <xmod:field
name="Reviewer"/>
<br /><br />
<strong>Review:</strong><br />
<xmod:field name="Review"/>
</div>
In the rest of the template you'll see <xmod:field> tags (highlighted
in red) corresponding to the fields (or controls) we created in the Form
Walkthrough. We've provided a bolded caption for each field using the
<strong> and </strong> HTML tags. To indicate where a line
break should go, we've added the HTML <br /> tags. The important
point to remember is that all we're doing is creating a mini-web page
and sticking in data from our form, via the <xmod:field> tags.
- Click "Save Template" to save our Detail
template then click the Add Template button to create a new template.
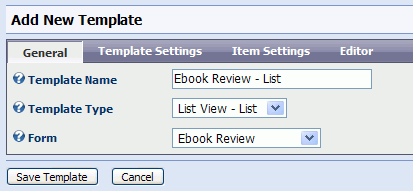
- Click the General
tab and give this template the name "Ebook Review - List". Choose
"List View - List" for the Template type (do this with your
mouse and allow the page to postback to the server). Once the page has
posted back, you'll see 2 new tabs: Template Settings and Item Settings,
which we'll cover in more detail in a bit. Finally, select Ebook Review
from the Form Fields drop-down list box and allow the page to post back
before continuing.
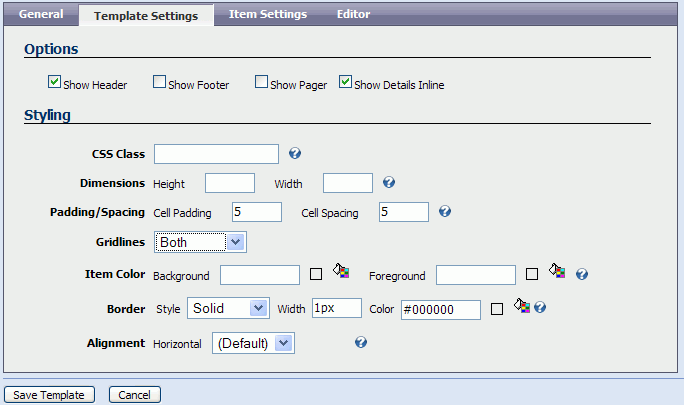
- Click the Template Settings tab and fill in the
form as you see it below:

On this tab we're telling XMod how the list view should look and function
as a whole. We're telling it that when someone clicks a link to see the
details of a record, it should temporarily hide the list view and replace
it with the detail view. This is done by checking the "Show Details
Inline" check box.
Next, we want each record in the list to have some white space between
them, so we've specified cellpadding and cellspacing of 5 pixels. Finally,
we want a border around our list that is a solid, 1 pixel black line.
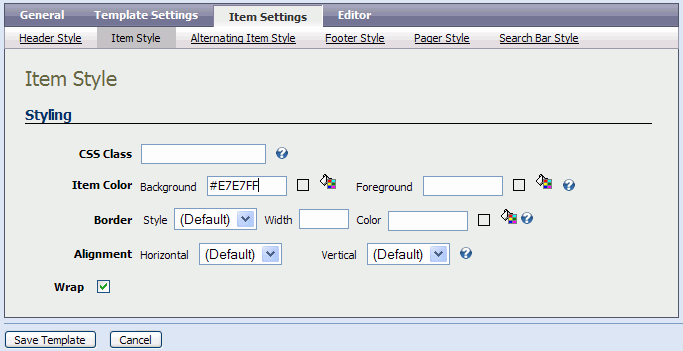
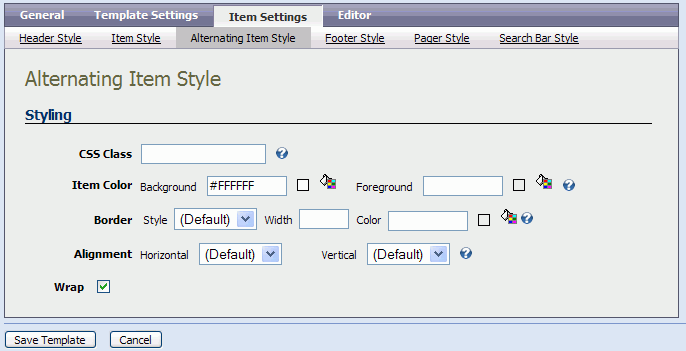
- Click the Item
Settings tab to specify how each item in the list will be displayed.
On this tab, you also control how the pager, header, footer, and search
bar will look. You can read more about this in the How Do I Create A Template
help topic. To keep things simple, we're only going to focus on the Item
Style and Alternating Item Style sub-tabs. The Item Style settings apply
to the odd-numbered items in the list - i.e. the 1st, 3rd, 5th, etc. The
Alternating Item Style settings apply to the even-numbered items - the
2nd, 4th, 6th, etc. If no Item Style settings act as the "base"
style for all items unless overridden by settings in the Alternating Item
Style settings. So, if you don't specify anything for Alternating Item
Style, then the Item Style settings will be applied to all items in your
list. Fill out the Item Style and Alternating Item Style sub tabs with
the information provided below. Basically, all we're doing is specifying
the color #E7E7FF as the background color for each odd-numbered item and
the color white (#FFFFFF) for each even numbered item:
- Next, click the Editor
tab to reveal the template editor. The contents from your detail template
may still be in the editor. This is done by XMod to save you some keystrokes
if you want to create a series of similar templates - one after another.
In our case, though, just delete the contents. Copy and paste the following
code into to the editor:
<xmod:field name="Title" class="NormalBold" detaillink="true"/> by <xmod:field name="Author" class="Normal"/><br
/>
Reviewed by <xmod:field name="Reviewer" class="Normal"/>
This code is similar to what we've seen in the detail view template.
There are two changes of note. The first, highlighted in blue is the "class"
property of the <xmod:field> tag. This allows us to specify a CSS
class to the contents of the field. Here's we're applying the DNN NormalBold
class to the title and the DNN Normal class to the other fields. Second,
we're using the <xmod:field> tag's "detaillink" property.
By setting its value to true, we're telling XMod to turn the ebook's title
into a link that automatically loads the full ebook review (i.e the detail
view).
- Click "Save Template" to save our list
view template..
- At this point, we have enough templates, but we'll
create another grid-style list view template, just to show how it is done.
Click the Add New Template button to create our new template. On the General tab, type "Ebook Review
-Grid" in the Template Name field, select "List View - Grid"
from the Template Type drop-down list and allow the page to post back
to the server. If necessary, select our Ebook Review form from the "Form
Fields" drop-down list.
- Click the Template
Settings tab to set the styling for the grid. It looks very similar
to the Template Settings tab for List-type list templates. This time,
we're additionally going to check the "Show Header" check box
so column headings will be shown. Additionally, we'll set the Gridlines
setting to "Both".
- On the Item Settings tab, click
the Item Style sub-tab and verify the background color is #E7E7FF while,
on the Alternating Item Style sub-tab, the background color is #FFFFFF
(white).
- Click
the Editor tab and delete anything that
is in the editing area. Grids are made up of columns. In XMod, they are
represented by <column> tags. To create a column, simply select
it from the Template
Tag drop-down list
and click the Add button:
When you do this, the <column> tag designer will pop-up (please
make sure your browser is set to allow pop-up windows). This designer
is kind of a mini-editor for a single column in your grid. It allows you
to set the column properties (Header and Footer) and insert additional
XMod fields, just as you do in the main editor.
The first column will list the ebook's genre. So, in the Header field,
type "Genre". Then either choose <xmod:field> from the
drop-down list to create the tag for the Genre field or simply copy and
past the following text into the editing area of the column designer:
<xmod:field name="Genre" class="Normal"/>
When you're finished click the OK button to hide the designer. In the
main editing area you'll see:
<column header="Genre"><xmod:field name="Genre"
/></column>
You can follow the same process for the remaining columns or simply
copy and paste this code:
<column header="Title">
<xmod:field name="Title" class="NormalBold"
detaillink="true"/>
</column>
<column header="Reviewed By">
<xmod:field name="Reviewer" class="Normal" />
</column>
- Click "Save Template" and you're done.
All that's left is to configure an XMod module to use the templates and
the form.
- From the XMod module's Actions menu, select "Configure
XMod Module". This screen enables you to determine which data is
displayed and how it's displayed by choosing a form and a list and detail
template.
- On the General Tab, select our Ebook Review form,
created in the Form walkthrough, in the "Data Entry Form" drop-down
list.
- Click the "Display" Tab to assign the
templates we just made.
- Select "Ebook Review - Detail" from
the "Detail View Template" drop-down list.
- Select "Ebook Review - List" or "Ebook
Review - Grid" from the "List View Template" drop-down
list - depending on which view you'd like of your data.
- Click "Save Changes" to save your settings
and return to the main screen.
- Next, you'll want to add some test data. To do
so, select "Add New Item" from the Actions menu to bring up
your data-entry form. Add a few test records and you'll be able to see
your templates in action.
For More Information on XMod Template Tags, see the Template
Tags section